Showing posts with label crochet. Show all posts

Monday, 10 November 2014

Blogging through the alphabet {Totally Useless, Very Willing.... and some eXtremely lovely Yarni-ness}

I was watching a film with my hubby recently, which included a scene in a psychiatric hospital. I looked at the patients all sitting quietly - some doing jigsaws, some drawing, some just sitting quietly.

Do you know what thought crossed my mind?

"I would LOVE to be sitting quietly like that, reading or doing a jigsaw"!!!

Yes, my life is so hectic, that a scene in a psychiatric ward appealed to me.

If you are mother of small children, this concept will not be lost on  you.

I hope I am not the only one that thinks that way, anyway!?!

So, back to blogging through the alphabet.

I was doing SO well to begin with.  I kept up, in ways beyond I could have imagined.  Then, reality struck.  I ended up having a week that found me unable to join in with the letter of that week.  I managed to do a nifty little "squish two letters together" week, the next week.

Then, it happened again. This time I needed to merge THREE letters together.  Wonderful as they were, and one of my most precious posts, but still a reminder to ME of how useless I am.

Today, we hit the ultimate catch up. FOUR weeks of catch up, to be precise.

I sigh at myself, and shake my head in despair.

More than that, I look deeper into my life and see myself over and over - I start things, and I am USELESS at keeping up.  It's a character flaw for sure.  You see, I am so very willing to take things on.  I see something, and know I will love it - I see the benefits it will have.  I despair at myself, however, at how incredibly awesome I am at failing.

People often comment about how I am a "Super Mum", and other such nonsense.  I know the real me, and there's not a lot "super" about it. I just see the things that are far from perfect, and how much room there is for improvement.

I guess people just compare me to their own situation, or their own perceptions of life and how simple, or not, it should be, and reckon that what I do exceeds their own limits?

There is one thing that drags me up from the gutter of despair, as I look at my useless ability to set out what I plan to do.

God's perspective.

What I am expecting from myself is PERFECTION. I want to do things perfectly, and completely.  I am learning that I am not perfect, and never will be.

We are reminded that we are to GROW in grace. It's not something that instantly and entirely transforms us from sinner to "saint".

I've learnt that much of my feelings of failure, in life, come from trying to please others, and not God. I worry, more than most people imagine, about what other people may think. Weirdly, not in major issues - those I feel quite comfortable in. It's the insignificant little things.... the "what if someone sees", "what if someone thinks I am useless", "what if someone thinks I look silly"?

What matters most is HOW I do something.  Did I begin something, doing it "heartily, as to the Lord, and not unto men?".

"Whatesoever ye do, do all to the glory of God".

Was my aim to glorify God in the doing of it, not the COMPLETING of it? Beginning something, and not completing it, doesn't make me a failure.  It means that something has come up, which I hadn't envisaged, and has prevented me from doing it in the time or manner I had planned. God's plans are higher than mine.  If He has planned that something interrupts MY plans, and I can't do it the way *I* thought was best, then my way WASN'T best!!!

Learning, always learning. Learning more about myself.  Learning more about God and His grace.

And simply because I am at least consistently useless, and I have missed more letters, lets just finish on a high note!

It's kinda related, though. I started off sharing some of my crochet creations with you, and haven't kept up with it. That's not to say I haven't still been creating crocheted loveliness.  I have.  I am still loving being able to pick up my hook and make things both beautiful and useful.  It's a great hobby.  So, I shall share one of my recent, lovely, yarny creations with you, and endeavour to catch up with sharing others I have made.... at some point.  *aherm*

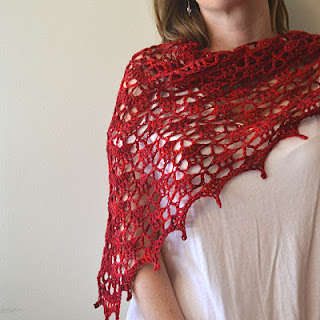
I give you one of the least favourite items I have made.  Well, I didn't really enjoy making it, for most of the time.  Does that sound weird? It's a shawl, and for a good part of it you only use SC/DC (US/UK terms).  Lots, and lots, of DC. Little, tiny, fiddly, DC FLO (front loop only). It seemed to take AGES to grow. The only break in the monotony was the variation between the stunning yarn from Unbelieva-wool (find her here on Facebook - FANTASTIC yarn dyer), in her "Sunset Boulevard" colour-way - it's stunning, as yo will see in a mo.  I also used the end of a purple gradient from Sam, too - alternating between the two. EVENTUALLY, I got to the border, and it got a little more interesting.  I still wasn't falling in love with the thing, and was just desperate to get it finished. Then, I locked it.  Suddenly, I decided this thing was GORGEOUS.

You wanna see?....


I rarely make myself anything with my crochet, but THIS one I decided to keep! It just looks stunning with the bright colours, and it looks just like a sunset! I have never had so many comments about something I have made, as I did when I wore this to Church last week! The chilly weather reappearing was the perfect time to wear it.

If you want to make one for yourself, you can find the pattern on Ravelry - it's called "Desperately Seeking Shallow".  You will need sock weight/fingering weight yarn, and a size 4 hook. Also, a lot of patience.  The pattern is particularly versatile, and even allows for some fluffed stitches - especially forgiving in the border.  You can make a deeper border, but you will need quite a bit more yarn, as it's a hungry pattern.  I probably used about 120g for mine.  You will also need to follow the instructions carefully regarding the stitch marker at the end of the rows, or else you won't get a nice, flat edge.  I learnt that the hard way, and had to frog quite a bit to get it right. Another bonus - it's FREE!

So, there we have it.  6 letters in one post.  Let's see if I can get the Z at the right time!?

(Editing to add that I haven't, but I must get this one published, and get a "Z" added!!!)


Saturday, 22 March 2014

Crochet Creations {South Bay Shawlette}

It's been a few weeks since I shared something crochet related, so here I am sharing!

Today, I will share about my new love for shawls.

Yes, shawls.

I thought shawls were for old biddies in the 19th century, but they are, in fact, a thing of beauty, and quite versatile.  They can be worn in a traditional way, or asymmetrically over the shoulder, or "back to front".


I am a personal fan of the "back to front", but the other two ways to wear it would be great for a wedding. I think it would also be nice with a light jacket in the spring and autumn, or to keep you neck warm in the winter, with a slightly thicker yarn. Hmmm,  I think I need to work on making myself one....

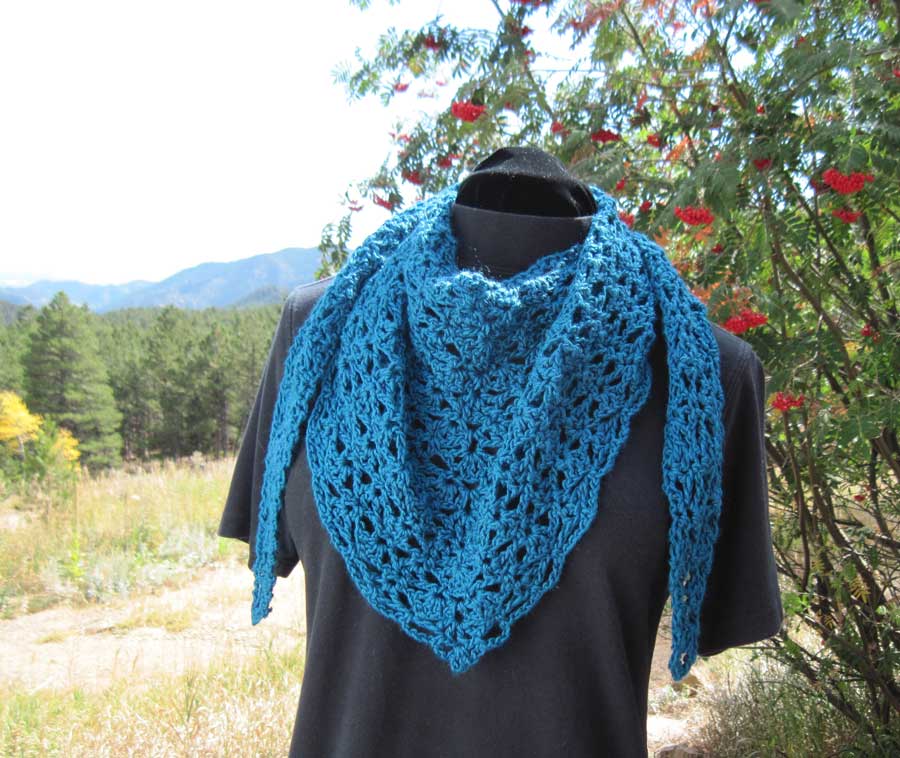
This shawl is SO simple to make. It's called "South Bay", and it's FREE!!!! You can find it here.

This was my first crocheted item which I used a chart more than a written pattern.  


Due to the simple nature of this pattern, and because it is a 2 row repeat, the picture pattern is nice to follow.  If you have never tried doing it this way, this would be the perfect start to understanding them.  Read through the written one, whilst looking at the picture pattern, and you will quickly pick up how it works.  This pattern is so simple, I can now do it without looking at the pattern at all. It doesn't make me clever, it just means it is VERY easy!

So, let me show you mine.


This is it pinned out on the bed (I will explain in a moment...)


This is a close up of the detail in the pattern.

When you hook up this pattern, it will all be kind of "squished", with the detail not very clear.  By blocking, you open up the pattern, by stretching it all out.  You can leave it unblocked, and it would still look lovely, particularly with slightly chunkier yarns.  This, however, was a lovely merino/nylon sock weight (fingering), and lent itself to being blocked.  It looks beautiful, and web-like, I think?

I will also add, about the yarn, that it was a custom dyed yarn, from Felt Fusion. You can find Shadow's page on Facebook, and she also has an Etsy shop. This was EXACTLY what I asked for - black, with a splash of red and purple. It's turned out better than I even imagined.  So, thank-you to Shadow.  Hand-dyed yarn IS more expensive than other "pick it up off the shelf" yarn, but, especially for gifts, it is TOTALLY worth it! 

So, blocking.  I can only share, at this time, how you block an item like this.  I know you can do it for individual blocks, say, in a granny blanket, to make them all the same size.  However, I cannot speak of this from experience, so will leave that particular angle for just now.  I am guessing the general principle is the same?

You need a large area to block on.  In this instance, I used the spare room bed.  Perfect for something big like a shawl.  You can also use those foam mats that are for children to play on - you can get hopscotch ones, and alphabet ones?  Anything that is soft, and that you can push pins into, basically. You will also need, then, pins.  Decent, sturdy ones.  

The next part depends on the  yarn you are blocking.  Certain fibres can tolerate steam blocking.  Certain ones are better to use a technique where you spritz it with water then let it dry.  I have used both, but as this one was a nylon/merino blend, I did the spritzting method.

I got my shawl, and spread it on the bed.  Starting in the top corner, I pinned it into the mattress. I found that you need to put them in angled inwards as you push them in, if that makes sense? They anchor more securely.  I worked my way along the top of the shawl to the other corner, pinning at regular intervals.  I then pinned the bottom point, and then worked up the diagonal edge, one side at once. This particular pattern I had added a picot edging, so I pinned at the tip of each picot. Then, I spritzed the whole thing with water, until it was damp all over.  Next, I went around the whole shawl again, pulling it all out even further.  You can pull it out as much or as little as you want, within the limits of the fibres.  The "harder" you block, the more stretched out it will be.  After you have stretched it out to where you want it to be, you just leave it to dry.  If you have a nice warm spare room like mine, it won't take long.

You can also block by soaking the whole item, and then pinning it, before it dries.  You can also pin it out, then use an iron on steam setting, and holding it ABOVE the work, making it damp all over.  As I said, you can't do that with ever fibre.  If you look here, you will see a nice overview of the ways to block, for the different fibre types.

Once it's dry, just remove the pins, and you are good to go.

I would also recommend, having done it today, that when you "weave" in your ends, that you use a sharp darning needle, and actually work INTO the fibre in the item, with the end of yarn, so it pretty much becomes the same strand of yarn you are weaving into. It seems to look good and you can't see where you have woven it in.

So, there you have it - the South Bay shawlette.


I have plans to now try a few more different designs of shawl, and I will share with you as and when I do them.  

I will also tell you , you can search on Ravelry according to what item you want, what type of yarn you are using, and what yardage you have.  You can also choose to only look at free ones, of which there are quite a few. I only found this out fairly recently, and it's handy to know you can refine your search like that.

 The other thing to bear in mind, is that many of these patterns you can do with many weights of yarn, by just changing which hook you use. This one, as I said, was sock weight, with a 5mm hook. You can just try it out, and see how it goes.  I also saw some lovely ones, when I was googling images for this post, where people have used several different yarn colours in one shawl - google the South Bay and you will see how many variations you can have for one shawl pattern!


Now, I hope the recipient loves it as much as I do!!! I may even be able to add a picture of her wearing it.... we shall see!

Wednesday, 5 March 2014

Chatting with Patrice {'av an avacado}


Hiya Patrice!!! We have spring springing up around us here.  Lots of pretty bulbs coming up, with lots of colour.  Weirdly, despite getting sunnier and brighter, we have had a few frosty mornings. It's weird because we have had such a mild winter, and NOW frost?? Hey ho!

Onto our chat!

  1. Do you like avocados?
Do I EVER!!! 

When I started doing Whole30 for the first time, I was THRILLED to learn that avocado is a healthier fat, and is one that can be eaten EVERY DAY!!!! I love the creamy texture of a really ripe avocado, and I  would put it through a salad, mixed in with a can of tuna, or I make guacamole.  

I love them.  That's what.

2.  Have you ever gone on a roller coaster?

Not a proper one. A lame one. And  that, quite simply, was enough for a lifetime!

No desire, WHATSOEVER, to go on one. 

Never.

Ever.

3.  Do you do cross stitch, needlepoint, crewel work, or needle punch?

I cross-stitched in years gone past. Not my thing now.

My Mum cross-stitched a lovely design which I keep on my kitchen window ledge as a reminder.


Now, crochet?.....

4.  Do you cook with gas or electric?

Now, here's a sore subject. 

Electric.  Sad days.  I dislike it intensely. It's an induction hob, ceramic. Currently, it seems to be even harder to control the heat than usual, which is hard enough as it is.  You can't just leave things to gently simmer, and there is no instant heat when you need it. My dream cooker is large, with gas ho and electric oven.

Don't get me started on my electric fan-assisted oven which is cooking unevenly just now....

5. Tell me something good, pleasant, or uplifting. Please.

I have wonderful friends.  I just had friends visit at the end of last week, and it was such a joy.  Good friends are a blessing.  They are a God-given delight, and can truly enrich your life and uplift your soul.  I had a bad week last week, then my friends came.  The Lord knew how my week would be, and that these visits would be a balm to my soul.  

 One friend made me laugh - proper belly laugh - for the first time in days. She gave me good advice and shared in some fun baking.  The other friend helped me in so many practical ways - even just holding my baby whilst she slept, and whilst awake, to free up my hands for other things. I think my friend would say that was win-win!!!

People, appreciate the people God has given YOU in your life. 


As ever, lovely to chat, m'dear!

Saturday, 15 February 2014

Crochet Creations {Crocodile Shoes}

Ok, so as much a song may spring to mind, I didn't actually make shoes. I made the most adorable little bootees for Tabitha.  They use a stitch called the "crocodile stitch", as it looks like little scales, I guess?

They were my first ever project that required a bit more concentration and savvy, as well as learning some new stitches.  Due to those factors, the first bootie took quite a it longer than the second one. Once I got the hang of the stitches, the second one was WAY quicker. It was SO worth it! It was the first "3-dimensional" item I had made, and I felt such a sense of achievement!


This be them.  SO adorable!! 

I happened to have the perfect buttons to match them, too.


Here's my adorable model wearing them! 

I made these weeks ago, but just hadn't got to sharing about them.  

I learnt how to do FPHDC and BPHDC.  We would call it FPHTC and BPHTC, though. 

"Front post half treble" and "Back post half treble".  Instead of putting your hook under the loop at the top of the stitch, you go around the post underneath - either front to back, or back to front. It took a it of googling and sussing out, but I got there in the end!


So, to make life easier for any who don't know how, and to save you searching, here are some videos!


This one is for Front Post.


This one is for Back Post.

I chose one American, one Australian, just to keep the whole thing multi-cultural!

There was another step that was needed in the pattern, but the pattern included some instructions for that step, and I found it fairly simple.

By doing the FPDC you get the little ribbed effect at the front of the bootie!

The adorable thing is this - the pattern includes a children's and an ADULTS size of this pattern! I want to make both, but have not quite got around to doing it yet, as I have been working on a couple of other projects first. I will, though, and I will share once I do!

You can find the pattern here, and I will share it on the crochet page, too. This pattern is NOT free, but worth the purchase, if you think you will have people you will gift them to.

Right, I have had a busy day, so I am off to work on my WIP. (Work in progress)  By next week I hope to share it, and share about a skill that will be new to me! BLOCKING!


Saturday, 11 January 2014

Fun with crochet {start of a regular post and link up}

In the last year or so, I have started to learn how to crochet. To begin with, I only made the odd little thing - hearts, snowflakes, stars. I had never made a proper "project".

This last year, it all changed.

I shared with  you about my first proper project - a baby blanket for my friend's baby - little Joash.


Doesn't he look cute?! I loved how this blanket turned out,and you can see more pictures of it in the original post about it. 

It totally inspired me to try more creations. Days after Tabitha was born, I began on a blanket for her. It's coming on, but I hooked up a few things as Christmas gifts, so it keeps getting put on hold!

I decided to do one big, enormous Granny Square. For those of you who do not know, a Granny Square is a basic square, which you join together to make a blanket. In fact, whatever else you can think of using squares!  It's very simple to make, and there are 100's of variations that you can create. The basic one is what I used for my rainbow blanket. 

On the way through, I decided to add in some variation. So, I added some rows of trebles, rather than the clusters of 3. Only trouble is, being an amateur, I have ended up with a wavy blanket! I think I managed to increase on those rows, by doing too many stitches in the corners? It's still perfectly "usable", I am sure - unique. Let's just call it unique. Sounds more intentional...

Here it is so far, but I still want to make it bigger. I hope to work on it today, and see how it goes. I MAY get it finished! 


I am thinking of attempting a bobble edging

(picture from the website above)


I may also add crocheted flowers in some of the corners, over the top of the blanket. We'll see how it evolves.

Last night, I also had some fun trying out some new squares - new to me, that is.  I just rummaged about in my yarn stash, and used some rather random, bright colours, to try the squares out. I am not entirely sure I would put these colours anywhere in my home - maybe a child's bedroom, where it wouldn't matter? I like them, in theory, but in practice they match NOTHING in my house! 


This one is called a "Sunshine Granny Square", for obvious reasons!!! It was very easy, and I love it! I would happily make a whole blanket in this design... just not these colours. You can find the pattern here.  


This one, I had seen popping up a lot in some online crochet groups that I am on. I loved it, too, so was determined to try and make one. Of course, this is not a "square"!! It's a hexagon. (There, maths lesson for the day - you now no longer need to do anything maths related, by permission of me...)

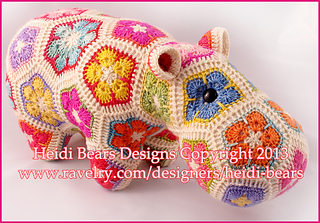
It's called an "African Flower Hexagon".  Isn't it lovely? It looks even better with a cotton yarn - they are more expensive, so I have less of that in my stash!  I was wondering what I could do with them, and was reminded that there is a GORGEOUS creation with shapes like this. I am now determined to make one, at some point. 


HOW CUTE IS THAT?!??!

It's definitely on my  hooky creations "to do" list!  I need to master "join as you go" technique, which joins blocks as you go, rather than afterwards. 

Who WOULDN'T love a Happy-potamus

There we have it. A little round up of how I have been spending some of my time in the evenings. It's a really relaxing hobby, with such quick and easy results to show for your efforts. If you have never tried, you should give it a go! 

I plan on regularly sharing my crochet creations and projects with you, even if it's just what I have found on Pinterest, or ideas from elsewhere. 

Also, check out my new "page" at the top of the blog. I am doing a whole compilation of pattern links and helpful hints and tips about crochet. I will update it regularly, and add patterns. I will particularly add them if I have done them myself, to give you a first-hand opinion about them. 


Tuesday, 8 October 2013

My crochet creation {...a rainbow baby blanket}

I just wanted to share with you about my creation.

I learnt how to crochet in the last couple of years, but had not done anything very amazing.  I had made a couple of hats, and come little flowers and hearts.  Nothing major.

So, when I saw some coloured yarn on a market stall, in every colour of the rainbow, it shouted "MAKE ME INTO SOMETHING WONDERFUL".  I picked out each colour of the rainbow, for a bargain price, and took it home with me.

I decided it needed to be a baby blanket, in rainbow Granny Squares.  Granny squares are SO easy to make.  In fact, crochet, on the whole, is a pretty simple needle craft to pick up and learn.

One of my favourite sites is Attic24.  She is the one who inspired me to make something with rainbow colours, as her creations are so vibrant and colourful.

To start with, I decided I wanted to make something that was square.  Something that is a square, can be folded into a triangle, which I think is nice for going around a baby. Some squares I decided to do red out to pink, the others from pink out to red.  So rainbow, and reverse rainbow!!


This is a red out to pink...


And, these are both, when I joined them together.

I did 9 squares in the centre of the blanket, and they are quite big - that top picture is one sitting on my lap, to give you an idea. I could measure it, but that would require me getting up and finding a tape measure....

I decided that it wasn't as big as I wanted it to be, but thought that if I went out another square of that size, it would have needed another SIXTEEN of those squares.  that would have been enormous, plus, I would have run out of yarn! PLUS, by the time I had finished, the intended baby would be a toddler...

So, I decided just to make little squares, only 3 colours in each one. I merrily began making them, until I realised that 3 doesn't go into 7 (doh....) and they would not look QUITE right along the edge.  But, 3 does go into 21, so at least they would fit along each side, with one on each corner.  I did them in the more "boyish" colours I was using, as it was going to be for a boy.

Here is the edging attached...


This is the back of the work.  You can tell, because of the green that you can see, attaching together the middle squares. 

Then, I did 2 rows of edging, before doing a scalloped detail right on the border, the pattern which I got from Attic24.


The next job was tedious.

I really need to learn/remember to tie in the ends as I stitch, rather than leaving it as a big job at the end.

Here is the mammoth task that I needed to do...


And this was only one corner!!!!

See all those loose threads??

Fun....

But, it was so worth it, because once that was done, then it was finished.


Ta-da!!


I should really have taken one that gave a better idea of the size, but it will certainly be plenty big enough for a baby!

I hope little Joash, my lovely friends' baby, will have many a snugggle underneath it.

Problem is, I now fancy making one for our new baby, and the children all fancy a big one for their beds!!!  Now, THERE'S a project!!

It was really simple to make, and I am no crochet genius.  If you feel inspired, I would really recommend Attic24, as she has loads of great tutorials, with clear pictures and instructions. 

I must update you on my utility room, next.  I am SOOOOO excited about that!!