Showing posts with label fun. Show all posts

Saturday, 16 July 2016

Lettering {which tools do I use?}

So, a quick second post about lettering.

The last post I told you about where I get my inspiration, so I thought I could now share about the pens/brushes I use.

It's been a journey, really. As I started off with Bible Journaling, I started off with pens for that, and progressed from there. I have two photos for you, and I will talk you through them all, and tell you where you can buy them.


1. Staedtler Triplus Fineliner

This is one of the first pens I started with. They come in a fantastic range of colours, but in order to do calligraphy type, you need to do "faux calligraphy".  For this, you need to add a second line on the downstrokes of your letters. Then, fill it in. I have demonstrated this technique on the photo. It works well, but you can sometimes end up with very tiny lines where you don't "keep in the lines". It's probably imperceptible, but I see it! lol  You can get these pens many places, including Amazon (UK) . 

2-4. Pigma Micron 

These come in a variety of thicknesses and colours. These pens, and the Staedtler Fineliners, are both pretty good for using in Bibles, as they don't bleed unless you do very thick and heavy lines. The very fine ones are great for print style lettering, or for very small lettering. All these first 4 pens don't work very well on watercolour paper, though, as they tend to gouge into the heavier weight, with their harder tips. 

This (UK) set has a good range of the nib sizes, all in black, including a brush pen (which I just don't like at all) and a thicker "graphic" tip, which is a nice thick tip for solid lines. You can also get them in sets with colours, but with that you have to decide on one nib size, as they are all the same in the multi-coloured pack. 

5. & 9. ( 9 is in the image below) Tombow Dual Brush Pens

These are a MASSIVE treat to myself. I got them for a knockdown price (with the pre-Brexit exchange rate!), and a friend who was returning to the UK kindly delivered them to me, so no postage costs!! I got the full set of 96, and have been LOVING them. I had already bought the primary set from Amazon to try them out, and had fallen in love with them. It's these pens that I have used for my entire series of pictures that went with the #animalpartychallenge on IG. Because they are water based, you can blend them on watercolour paper with a brush and water. You can also blend two colours together and create your own blends (simply just blending them on a piece of plastic)! The tips are self cleaning, so the new ink runs through and it goes back to the original colour. One end has the brush tip pen, and the other end is a finer nib. It takes a bit of practice to master using these (I initially didn't like them, because I didn't crack it as quickly as I wanted to!!! - patience.... ), but once you have, they write like silk. The textures and tones are beautiful, especially on very smooth paper. These are best for doing BIG lettering, although some people seem to be able to achieve much smaller text than I can! 

If are wanting to get serious about your lettering, the 96 box set is a very sound investment, as it's a lot cheaper per pen than buying the smaller packs. It's also massively reduced in price over this side of the Atlantic, compared to a matter of months ago when it was over £200 to buy it!!! 


6. Pentel Fude Touch Sign Pen

These pens are the ones that are able to give a lovely look to a more "normal" sized lettering. As with all the brush tips, you need to master the basic technique of modern calligraphy to be able to use them best. The ladies in my last post have videos that demonstrate the technique - think upstroke, thick down stroke. You can get practice drill sheets for this on many sites - free and "pay for" ones. 

These pens are a bit trickier to track down in the UK. The cheapest way I have found to purchase them is from an Etsy store. They come in a range of colours, and you can get the full set of 12 for £17 including shipping from Japan. You have to be patient, as it takes time to get here! If you can't wait, you can also get them here for a little more money.

I really love the gold and silver in the multi-pack, and the black is a pretty fundamental piece of kit, in my opinion.

7 & 8. Tombow Fudenosuke Brush Pen - soft tip and hard tip

These, like the black sign pen above, as what I would consider "essential" if you are serious about lettering. They give slightly different effects. The soft one gives a thicker line, and the hard one gives a very fine line on your upstroke.  These are available on Amazon, and are best value in a 5 pack - soft and hard are both available in these 5 packs.

10. Pentel Aquash Water Brush

I love, love, LOVE this tool!!!! This is a watercolour brush, in essence, but has a water barrel attached. You can either fill the barrel with liquid watercolour inks, or keep dipping it into liquid or solid watercolours. I just love the variation in tone that you get with each stroke. It's simply beautiful. There are three sizes available - think medium and thick brushes. Obviously you can achieve a different look with each. They aren't overly expensive, and are available as a three pack on Amazon. These absolutely work best on watercolour paper, as it's far more absorbent than other papers.

11. Paintbrush (I used a Taklon Size 3)

A good old fashioned paintbrush is also a tool you can use. This is one of the ones I found hardest to crack, and I still don't feel I have mastered it completely, but it gives a lovely effect. Again, like the Aquash brush, you have to use watercolours with it. But, you have to keep dipping it into either water then paint, or a liquid watercolour. I found I had to get my grip right with a paintbrush, moreso than other pens, and also the quality of paintbrush MASSIVELY matters. A round brush is best, and don't just use a child's cheap one. You just won't get the brush to move smoothly enough, in my experience.

So, there we have it.

Those are the pens and brushes that I use, and my limited experience with them so far! You don't need expensive pens to get lettering. You can even use Sharpies (which I have never tried!) or Crayola supertips!

Just grab a pen and start trying, and then take it from there!

I think I also need to do posts demonstrating each of these pens, just to give a better idea about how they write and look. No promises as to a time scale for doing that, but I will get started ASAP.  Any questions, just ask away in the comments below, or find me on IG @thejoyfulkeeper and ask there. I will also start trying to record which pens I have used on my IG pictures.

I am SO far from being a pro at this, so I hope this has been useful!?


Wednesday, 6 July 2016

Lettering! {where do I get my inspiration?}


I have been meaning to write this post for a looong time.

During my period of "blog silence" I took up creative lettering. It started off as an interest in being able to do nice lettering for my Bible Journalling, but it turned into a hobby along the way! I am now LOVING doing my lettering, and continually trying to improve on my new found love.


Some of my Bible Journalling


Journalling quotes from books I am reading.


What I have been meaning to share about is the resources I have used and the materials I use, as I have had so many people asking me on IG and Facebook!

I am no authority on these things. I share them with you on the basis that I am no expert and I can only tell you what I have learnt from others who are FAR more experienced and talented!

So, where to start?!?

I think I will do these as a series of posts, and begin with some of the inspiration for my lettering. First off, it is SUPER helpful to be on Instagram! That is THE visual place to watch and learn from others. It's where I found my first inspiration, and continue to be inspired on a daily basis.

My first ever "teacher" was a lady called Lisa, and you can find her at a few places.

IG: +Lisa Walters
Facebook: creativLEI
Pinterest: creativleimade
Periscope: +Lisa Walters
Website: www.creativlei.com

She is an extremely gracious and gifted lady, who has a great love for all sorts of crafty and creative things. She is regularly on Periscope, gladly sharing her tips and techniques, and Periscope (which I only recently discovered!!) is a fabulous place to ask questions, which she always tries to answer.

Lisa also offers a brilliant FREE course, "31 days to love your lettering", where you can watch videos and learn the various techniques involved in getting started with lettering.

She is really inspirational, and has helped me a whole lot! She has also recently dragged me kicking and screaming  lured me into the world of chalk lettering!


More of that at another time! Beware - letterers will lead you down bunny trails of all sorts of creative yumminess....

Another favourite of mine is Liss. I came across her on IG, and am currently signed up for her lettering class (not free, but it was my summer treat to myself!!), and you get to be part of a private FB group where she gives loads of advice and support, and where you get a stack load of inspiration from others who are learning, too.  Again, you can find her in several places.

IG: +liss letters
Facebook: Liss Smith
Website: www.liss.com.au/ 

Another favourite of mine from IG, is @handletteredtruth. Debbie produces beautiful lettering, and inspires me on so many levels.

There are loads more, but I will share them as they tie in with the various topics I share about to do with types of lettering, or materials used.

Another great way to "meet" other letterers is to do a month of writing prompts. Folks give all sorts of different prompts, and it inspires various contributions. I have just finished one about collective nouns for animals, in which I also started doing paintings of the animals using brush pens, which I previously had no idea I could do until I tried! Then there are ladies who run ones that are Bible verses for each day. It's always good to get scripture into our heart and mind, and what a nicer way of doing it than creatively?


#30daysofbiblelettering


#animalpartychallenge


My current one that I am following is #letterHISname (they all have hashtags, so you can find other people doing the same thing, for those who don't know these things, like I didn't until recently...) and it is run by two fab letterers - @coldsnowinharvest and @brittanyluiz. It's been precious and interesting to look at the verses where these different names are mentioned, and choose one to base my lettering on.


#letterHISname


#letterHISname


There are LOADS more lettering prompts out there.

I have one, myself, in the pipeline! I have created the graphic, but want to write a weekly blog post to accompany it. to help people out, due to the topic. I don't want to say much else JUST yet, but I plan to do it in August, and plan it all in July. Watch this space!!

I try and practice my lettering when I can. You can do it as doodles, or do it as something more creative. I like to do things with scripture and just pop it on the fridge!


This lettering was scripture from #scripturewriting with +Heidi St. John 


I am also trying to learn how to do watercolour painting - flowers, wreaths and writing. It's one of my favourite mediums, which I dabbled in as a teen.


I will tell you more about that in a post about materials and mediums.


So, there's a start for those of you interested in lettering. I will return with more helpful (hopefully!!!) info on the topic.  Check out my Pinterest board for places to find lettering inspiration, too. (See the link in my side bar!)

So GO! Have fun lettering! Learn something new, and get creative.


Thursday, 7 April 2016

Blokus {game review}

(this post contains affiliate links)

I have been intending, for a looooong time, to share with you about some of our favourite games around here.

We are a family who LOVES games, and I am sure there are other families out there like us - always looking out for new games to enjoy!

I am going to start with our most recent addition - one that we got for Susie for her birthday.  Susie is one of our children who especially loves games - particularly ones involving logic and strategy. She's very much like me, in that sense.

She's very much like me in many ways, but that is another story.

Susie was 9 this week. NINE. (We differ in age - definitely - add another nearly THIRTY years to mine... yikes) Last year of single digits. And yet, she seems so much older than that in many ways.

Again, another story.

Back to games.

I asked her what she would like for her birthday, and she thought she'd love a new game. I researched a few options, and she liked the look of this one.


Good choice, Susie. Good choice!

It wasn't one I was at all familiar with, but the rating on Amazon was fab, and it looked like our kind of "thing".

So, what is it?


I'm guessing the pronunciation is block-us - as in trying to block?

The game consists of:

- a special playing board - a grid with ridges you can place tiles in. (You couldn't play it without the board.)

- 4 sets of coloured, clear tiles, of various shapes, made up of squares.

- an instruction booklet

It's a simple game with one simple "move" - place your tile on the board touching ONLY at a corner with another of your tiles. It sounds simple, but the further into the game you go, the harder it gets! You can have your tile touch the edge of a different coloured tile, but not of the same colour.

That's it.

Simple!

You can play with 2 to 4 players. Rule play is slightly different with 2, 3 or 4 players. If there are only two of you, you have two sets of coloured tiles each, with a set order of play, rotating through the colours. If there are three of you, you split the third colour (red), but we played it without doing that, and it still worked.

Best, and most challenging play, is with 4 players.

For all the games I review, I am going to give you a list of Pros and Cons. I will also tell you why we loved it, or not!

So, why we love it! It's different every time you play. There is a compelling desire to get your pieces down and fit them in SOMEWHERE. You end up sitting and saying "I must be able to get this down?"  As you play it more you realise certain pieces are harder to place further through the game, but because it varies each time you play, sometimes you end up placing tricky pieces further through the game, even when you couldn't another time. I guess you could say we love it because of the endless possibilities?  We also love it because any child who understands the basic rule could play it. We haven't tried yet (because every time we've played the older children have all been wanting to play!), but I even think my nearly 6 year old could play, although the box says 8+.

PROS - bright; fun; engaging; challenging

CONS - lots of pieces that could potentially go "Missing", and the game wouldn't be so good without them all there; no bag to keep the game pieces in once you take it out the box


This is us playing with three. As you can see, the pieces only touch at the corners of the same colour.


This is the birthday girl playing. Smiling Susie.


This is us playing again in the evening, with 4 players. You can see here that pieces are now touching along the edge of OTHER colours, but not of the same colour. 

I find the game rather therapeutic and pretty. Lots of coloured pieces, fitting together neatly. This, from the lady who loves sorting newly sharpened pencils, by colour. 


Another couple of great points. It's not overly expensive. I wouldn't say it's a cheap option, but it's certainly not extortionate. It's currently just under £18 with Amazon Prime.

Another plus is, that, although it is only 4 player, you could easily turn it into a "tournament" type game play, with knock out rounds leading to a grand final. That way, everyone gets to play, but the best players get to have an equally challenging opponent for the final. Win-win! (because we all know that it can be a little frustrating playing with a younger child who hasn't got quite the same strategy and logic skills!...)

So, there we have it!  Blokus - a fab game for all the family, that's easy to learn and simple to play. What's not to like?

(I'm thinking I may come back and do a star rating for various aspects of each game I review, but that's too much for my sleep deprived, Mummy brain right now.)

If you have played this before, please share what YOU think, in the comments! 


Friday, 3 July 2015

Fun in London {the joy of encouraging friendship}

I just logged on to Blogger to write a new post, and was reminded of the topic of a recent post - singing God's praises.  Admittedly, I have had lots of occasions in the last two weeks when singing praise was easy. Days of blessing and encouragement - joy and laughter.  In the middle of it all, we have had a trauma, where I had to FIND things to praise for. It wasn't too hard, but they weren't the things that were at the front of my mind.

I have so much to share about, and I don't quite know how to divide it all up! Fitting it all in one post may be overwhelming for YOU, the reader! So, I will split it up, and start at the start.

Two weeks ago, I hammered out my  blog post in record time. They were thoughts I had wanted to share, but my time was short.  Why?  because I was heading off for a day trip to London! I LOVE London. I love that it is jam packed full of history, waiting for me to learn about.  I love the architecture. I love the interesting places. I love the feeling of jumping betweens the centuries, as you go from place to place. Brand spanking new sky scrapers shadowing the ancient and mysterious.

LOVE. IT.

The thing is, it wasn't the city that was calling my name that day.

Nope.

It was a PERSON!

Someone whom I had I never met.  Never ever.

It was another one of these *whispers* INTERNET acquaintances.

GASP.

The good news is that we have a mutual friend, who was able to confirm we were both safe and reliable!

Melissa is Heidi St John's "virtual assistant".  (That means she assists from a distance, not that she's a computerised character - meeting THAT would be just plain WEIRD!) I had the joy of meeting Heidi, and some of her family, THREE years ago (where does time GO?), and had been in touch with Melissa when working with Heidi on the blog hop a couple of years ago.

Melissa came over to the UK on a Church missions/choir trip, to Exmouth, in Devon. When she knew I lived near London, she asked if we could meet up.

Now, I don't go out much.  I am the joyful mother of my children, and I firmly see it as MY job to care for the children full time.  Robert works outside the home, and has enough to do without me constantly asking to do this, that and the other. So, when I ask to do something it's not the norm, and I massively appreciate him saying "yes". Which he did! (I read a blog post recently which suggested you shouldn't need to thank your husband when he looks after the children, because it's his job, too, but I disagree. Something as big as this is NOT his job, and I thanked him immensely! - I digress!)

I was so excited about not only going to London, but meeting Melissa. I know you don't fully know what someone is like from the Internet, but having met Heidi, I was confident we would get along. Which we DID!

Melissa, not being familiar with London, left most of the planning up to me, but told me what she wanted to see. She requested Westminster Abbey, which I hadn't visited, and to eat somewhere that was an "experience".  So, I got planning.  I like doing that kind of thing. I got us tickets for the open topped bus tour. If you are ever in London, it's a GREAT way to see a lot of the city.  There is a live guide (a dead one would be gross, I know....) - as opposed to a recorded tour - and you can hop on and off where you want. You also get a river trip. I got mine with Tesco vouchers, which made it FREEE-EEEEE. (We all love free, right?) I researched the Abbey (note to self - next time book your ticket online and avoid the 30+ minute wait....), and then thought about eating out. I asked around and found something that was an "experience".  A restaurant on a river boat! Eat dinner, and see London where you sit. You don't get to do that just anywhere.

Having arranged where to meet, and the agenda for the day, the day dawned bright! The sun was shining, and it looked like a great day to tour London. After a bit of to-ing and fro-ing, Melissa and I found each other! It was a joy to finally meet, and we got chatting straight off. I know.  Strange.  ME, chatting.  I know.

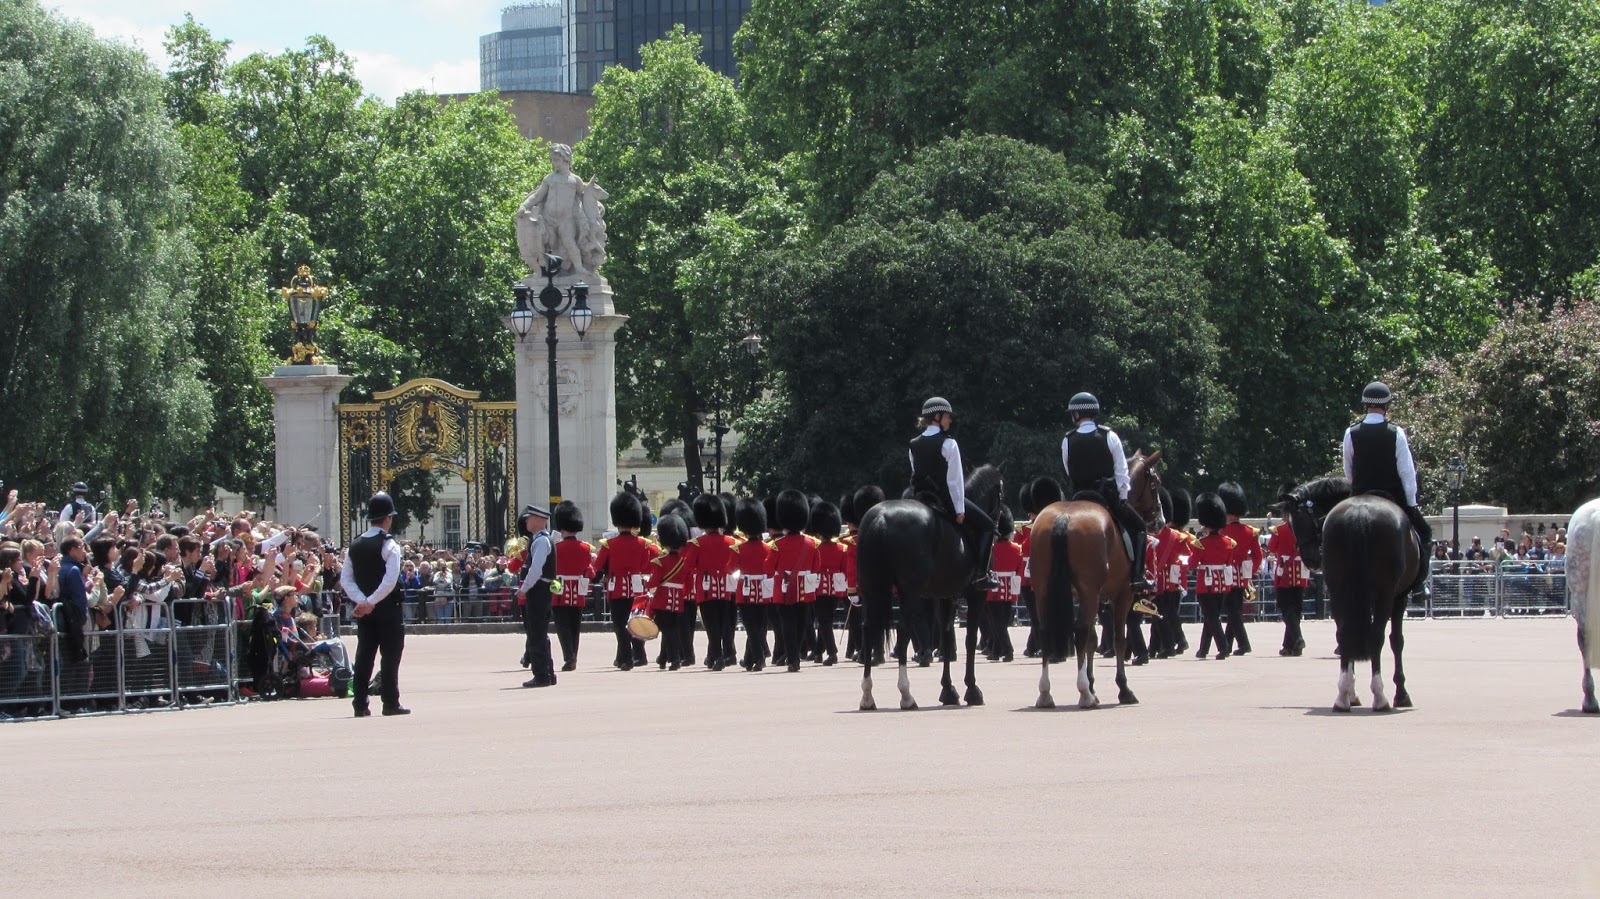
Melissa's first port of call was Buck Pal.  Otherwise known as Buckingham Palace, of course. We were on our way to see the changing of the guard.  Now, anywhere else, a guard change would be some guys marching up, changing places, and marching away.  Not in the UK. Ooooooooh no.

Pomp.

Circumstance.

Grandeur.

A lot of marching up and down a  courtyard by two very hot looking standard bearers, whilst two military bands from two different regiments play a lot of music.


It was busy, and getting to the front of the fence was a challenge, but we got there. It certainly gave Melissa a snapshot of the full glory of our military in full dress. And, you've gotta love a military
 band!


Our initial view, from the wrong side of the street!


The new "guard" arriving, with their band.  This is the RAF.


These are the Household Cavalry.  They are based down at Horse Guards, at the bottom of The Mall. 


These are the two guards, marching up and down.  One from the regiment ending their guard duty, and the other from the one coming on duty.  They marched backwards and forwards in diagonals, across the front of Buckingham Palace. I am sure there was some kind of order to it, but it looked random to us! 


These bad boys were coming OFF duty.  If there is something that is iconically British, it's THESE guys! They are wearing Bearskin Caps. Yes, made from bearskin. Here's a snippet from Wikipedia....

"The standard bearskin of the British Foot Guards is 18 inches tall, weighs 1.5 pounds and is made from the fur of the Canadian black bear.[6] However, an officer's bearskin is made from the fur of the Canadian brown bear as the female brown bear has thicker, fuller fur and is dyed black. An entire skin is used for each hat.[7] The British Army purchase the hats, which are known as caps, from a British hatmaker which sources its pelts from an international auction. The hatmakers purchase between 50 and 100 black bear skins each year at a cost of about £650 each.[8] If properly maintained, the caps last for decades."

They are Foot Guards from the Grenadier Guards regiment. You can identify which regiment by plumes on the Bearskin, positioning of buttons, and the badge on their collar.  In case you wondered, I am no expert. I googled it.... and found this site useful. 


This is the bands playing in front of Buckingham Palace.  We couldn't see the Grenadier Guards so well, but the RAF band was at our end. 


This is the Grenadier Guards departing. The barracks fro all these regiments is just around the corner, at Wellington Barracks. Not too far to go back "Home".  I'm pretty certain that the tour guide mentioned that all these chaps have to have served on active duty for a certain length of time, before getting to the stage of home guard duty. These are all seasoned military. 


There was a slight problem with the day, which I discovered at this point. I had my phone. I had my camera. I made a foolish assumption.  That I had brought  a spare battery that was actually charged. Nuh-uh. *face palm*  So, from this point onwards I have very few photos. Also having a phone that wasn't so full of other junk that it has SPACE to add more photos, would also have been good.  Note to self....

I did get a few snaps on my phone, outside Buckingham palace, and on the bus.


This is the Victoria Monument. I wrote a blog post about it, several years ago, which you can read here. It tells you more about it. 


This is Nelson's Column - immortalising the great military genius, who won a great victory 200 years ago, at the Battle of Waterloo. He was a pretty 'armless guy..... boom boom. Read more about him here


From there we walked down The Mall - the long road that connects Buckingham Palace to Trafalgar Square - to get on the bus.  It's a lovely tree-lined street.  I like it a lot.  The us then brought us around some famous landmarks until we got to Westminster.  We hopped off and went to the Abbey.

This was interesting to me, on many points.

I LOVE the history.  The poor lady verger showing us around found out quite quickly that I was, erm, enthusiastic about the history.  I hope I didn't embarrass Melissa too much. There are many kings and queens buried there.  It's full to capacity now, so monarchs will no longer be interred there. I believe The Queen Mother is buried in Windsor.  Knowing our current Monarch's love for Windsor, I imagine she, too, will be buried there, when the time comes.

The interesting points?

Well, the history, of course.  Buried there, and remembered there, are MANY well known Brits.  You aren't allowed to take ANY photos in there, so I can't show you. There are poets, in "Poets Corner", including authors, too. Musicians and composers - Handel has a fairly prominent spot. Then, there are scientists and explorers.  David Livingstone is there. Well, all but his heart, which remained in Africa where his "heart" was. This is one of the interesting points. The C of E verger, when I vented my interest in Livingstone, said something along these lines. "Of course, the work of David Livingstone as one who helped abolish the slave trade, is far more significant than anything else he did - he only had one convert as a missionary, and they changed their mind later".

You WHAT???

SERIOUSLY?

Melissa and I exchanged a look over that one.

A wry, shocked look.

That man laid the way for MANY missionaries to forge into countries where the people did not know the Saviour.  He did GROUND-BREAKING work. Yes, his work in abolishing the slave trade was brilliant.  To ease the suffering of this world is wonderful.  Eternal salvation? No comparison.

ANYWAY.

We moved on.

More incredible building work and detail.  Truly stunning. Until we got to two more parts that had me rolling my eyes, I'm afraid. "Saint Edward's" tomb.  So revered than he was canonised. Who are WE, as mortals, all sinners before God, to elevate ANYONE to "sainthood"?? We are all equally sinners, and none of us can do anything to merit a higher place in life. We can only claim Christ's shed blood, and atoning sacrifice, to lift us from death and judgement. We will never be anything of ourselves, and anything others see in us is Christ alone, and doesn't deserve the "sainthood" awarded by men.  Sorry.  Rant.  The Bible is very clear on this, and it drives me a little scatty.  Moving on further brought us to the Lady Chapel.  In memory of queens?? No.  "Our Holy Lady, the Mother of Christ". As much as she was chosen by God to bear Christ, the whole point WAS that she was just a woman, like any other woman. Privileged? Yes. Undeniably.  Requiring special titles and reverence, above any others, to be worshipped and given Sainthood? NO!

The other thing that had me eye rolling was the Verger's obvious dislike for the Reformation, and Oliver Cromwell. They had "destroyed" parts of the beautiful abbey.

Boo hoo.

It's a BUILDING!

Beautiful.

A testament to the creative minds that God has created mankind with. Genius of its day, in the way it was built. Skilled craftsmen put it together. But, it's NOT the Church. It's not the building that matters.

It was definitely worth the visit, although fairly pricey. Especially if you love history and architecture. and fascinating facts.

Next, we hopped back on the bus to see more of London. On the way round we THINK we saw the cavalcade of cars for Michelle Obama.

Great.

We love her.... honest.

We got off the bus at the  Tower of London. (That's a place I want to visit!)  We then got on the river cruise back up to Westminster. It interesting to see the city from the perspective of the river. Once again we had a live commentary, which was interesting.

When we reached Westminster we had a few minutes to spare, so we went and had a wee look down Downing Street. The PM wasn't at home, and as Melissa very politely observed, you can't see much anyway. Our PM's residence is slightly less salubrious than the American head of state. Not very British, really. Hey ho.

We then headed out for dinner.  Now, Melissa wanted an "experience".  When I stepped on the boat and sat down, I thought it was going to be a VERY interesting experience. I forgot I get travel sick on boats, and that boat was bobbing up and down on the River Thames!!! I had a slightly panicked moment, where I thought I was going to have to run off the boat and go to McDs instead. But, I got used to it, thankfully, and despite the odd moment where it got a bit "bobby" again, I survived!

The dinner was lovely, but that wasn't the highlight.

This was THE best part of the day. I got to have a lovely chat with Melissa, who encouraged me beyond measure, as we chatted about parenting, relationships and home schooling.  The Lord had appointed our meeting, in His own perfect way, at a time I needed it most. It was uplifting and I appreciated it SO much. Chatting with a fellow sister in Christ, and gaining the wisdom and perspective of another, was just priceless. It filled my heart and soul with renewed enthusiasm, and a sense of "things can be ok". She challenged me to think outside the box, and to be brave enough to do things differently to what I was used to. I'm not even sure she fully realised how much the whole day was a balm to my soul. I told her it was a blessing, but, really, it was a deep, full and satisfying blessing.

It was ALL of God.

HE is the great Master Planner of our lives.

He equally allows struggles and trials, but when He brings blessings? - it's like a cool drink of water in a desert.

That whole day was incredible, and in God's perfect timing. He blessed me with a day that is one of my perfect sorts. Fascinating things to see, and fabulous company. For me, it can hardly get better.

Hang on.  It could.  I forgot to mention my fun trip there...

I went on the train, and brought a book with me. I don't often get the chance to read in peace, these days. So, a train journey seemed ideal. I brought a book with me that I have "started" I don't know how many times.  I WILL finish it.  IN the mean time, it's blessing my heart every time I dig into it. It's also incredibly amusing.  It's called "Unglued", and it's written by Lysa Terkeurst. Lysa writes in a way that is so REAL! You can totally relate to what she is writing about, especially, in this instance, if you are an emotional being. I had several "laugh out loud" moments, and this one really tickled me.....

"That's what makes raw emotions so complicated.  They come from nowhere and run us slap-over.  Which is why it's so important to prepare in advance for what will surely happen during your next trip to Target - or while attending the unpredictable family reunion, driving unruly kids in the car pool, or dealing with difficult people at the office. Or when, at the next Bible study meeting, you happen to sit by the woman with the special ministry of discouragement".

I pretty much spat my mint tea out at that quote!

Boy, have I met those kind of folks in my lifetime. The special ministry of discouragement!!!

We should ALL be encouragers.  It's not some special spiritual gift.  It's what EVERY Christian should try to be.

That's what made my day so special.  Melissa encouraged me.  She built me up, and helped me to see how, by God's grace and guidance, I could do the job of parenting and wifehood that He has called me to do.


(It's a bit of a dimly lit picture, but we were trying to get the London Eye in the background!)


I wonder who you will come into contact with today, or in the next week?  Are you exercising the spiritual muscle of encouragement.  You will bless others richly, if you work at being an encourager.

I had such a precious day, and I am so thankful to God for the friendship I have forged, through God's intricate plan, of seemingly random connections, for HIS glory! I love that we are all part of God's body, and even though we don't live near each other physically, we are joined together. We can build each other up, and encourage one another, through our mutual love for the Saviour, FROM the Saviour. So, so precious.

Thank you to Heidi for the first connection.  Thank you to Melissa for being brave enough to meet the random, unknown Scot.  Thank you to God for His goodness.


Tuesday, 25 November 2014

Tots on a Tuesday {Mess free finger painting - ohhhhhh yeah!}

I was tidying up my homeschooling supplies, in a bid to chip away every day at my clutter problem, (Yes, I have a clutter problem - the first step in rehabilitation is acknowledging, right?.....) when I came across a set of finger paints I had stashed away.

Now, I am the epitomy of the useless home-educating mother.

I HATE strongly dislike things that make mess.  Mess = extra clearing up to do, on top of normal life with 8 children.

Yup.

I avoid messy activities like the plague.

I have recently come to the conclusion, however, that it MAY be ok, under strict management.

MAYBE.

Better still is finding a painting activity that makes NO MESS?!!?

Yes, you read right.

NO MESS.

I was wandering around on Pinterest (wandering? perusing? obtaining creative inspiration?), when I came across a GENIUS idea.

It's quite simple, really.  All you need is ziplock bags, electrical tape, and paint. Not in that order, or it won't be mess free....

Put a few good squidges of paint in the bag, and squeeze out the air.

Shut the bag.

Put a piece of white paper onto the table.


Tape the bag  VERY firmly to the table, over the paper.


(Of course, making it a sneaky lesson in colour mixing, and primary/secondary colours, is always good!)


Let the little ones loose.

Hope fervently you have taped the bags down correctly....

The result??


(Elijah, only second time writing his name - not perfect, I know, but *I* didn't teach him, he taught himself - clever little chappie!)


This activity is a lot of fun, easy to do, and if you are careful, very much reusable.  I will be doing it again, especially when we get to doing phonics with the younger children, as it's a great kinesthetic, and fun,  way to do letter formation.

Oh, and remember the "no mess" part??

Just don't leave any pencils nearby a 2 year old, and it will be FINE.

Minimal mess, thankfully. Minimal.

Compared with normal painting??

LOVE it!

On Pinterest, I also saw people putting it up on the window, for little ones to do. My slight concern would be that if there were a leakage in that situation, clean up would be more tricky than my tiny dribble on a wipe clean cloth. If you're brave, you could give it a go! 


Please feel free to link up with any posts you have on Tots Activities, and pop the button on your post!  We'd love to see what activities you are doing with your tots! 


TheJoyfulKeeper
<a href="www.thejoyfulkeeper.blogspot.com" target="_blank"><img src="https://blogger.googleusercontent.com/img/b/R29vZ2xl/AVvXsEgkygLKJI_UPeCLyfkYDPmJaTPV_TxQoHCrw_-1mQz06WKjxw-AvPGZZhHpAa68N1y8t7i1TpNukWmS8zJR4_jEqiHx4Qfwk0ofHRFqk99Pw052zhC8jUDnufhgNGeM0Igf_0AX4WITI4Hv/s153-no/duplo_patterns_button.jpg" alt="TheJoyfulKeeper" width="125" height="125" /></a>


Friday, 27 June 2014

Blogging through the Alphabet {illness, imps, imperfections and iMovie}

Well, this week has been interesting.  We are still waiting for the "axe to fall" on the other 7 children, in the chickenpox department.  Every day we have random inspections, to see if any spots have appeared.  Possibly, just possibly, I think some may be appearing today!  I really just want this whole thing done and dusted, and the suspense is about killing me! *grin*  Did you know how many little, random spots and blemishes children have? Many, I tell you.  Not helped at all by my next subject.

My imp.  Simeon.

Another trying week with my rambunctious 2 year old.  I think, having been ill, he has had  an enormous amount of energy returned, which he is putting into making mischief.  He is constantly getting into things, and also has developed a liking for screaming when he doesn't get his own way.  Children have uncanny knack for wanting their own way.  It's why we are told, as parents, that we need to "train up a child".  They need to learn that it's not the right way to behave, and they can't always get their own way. It's a tiring job, raising children, I can tell you.  Mostly, on our part, determined by the amount of effort we put into being consistent and attentive in our duties.  Not as much as I ought to, so often, I fear.  I see my imperfections REGULARLY as a parent, and bemoan my selfish, and sinful, and lazy heart, that doesn't do as much as I ought to.  I pray that the Lord would help me to be more of what I should be.

My imperfections were made manifest yesterday, all sparked by my aforementioned imp.

I was busily trying to get the dinner out, as well as getting ready for some Church folks coming round to plan for Holiday Bible Club.  My prideful heart felt I MUST make something home-baked, or I wouldn't be the hostess they were expecting.  I was sure I would have criticism for only giving out shop bought treats.  How silly.  How sinful of my heart.

Well, Simeon soon put an old proverb into practice in my life.

Yes, my friends - pride goeth before..

destruction.


Not a fall.  That's a misquote.

Destruction, and a fall, is what happened.

My brownie mix, which had everything done, other than the flour stirred in, was sitting on the counter.  I was busy doing some other, more vital, jobs, when Simeon knocked my bowl - tipping out a good lot of the mix, and nearly all the flour, onto the floor.


Yes.  That's a brownie splat.  The children were all seeing "pictures" in it - "Ooooh, I can see a face" - "I can see a duck" - I was seeing a mess which I couldn't clear up because dinner needed to be served.

*Sigh*

Thankfully, my husband and son blessed me immensely by clearing it up after dinner, whilst I did other things that needed my attention.  It was no small job, and I am very grateful!

My biggest sigh was over my own pride.  Had I just focussed on one thing - caring for my family's immediate needs - instead of worrying about what others may say or think, then it would not have happened.  I wanted  to give the visitors what I thought was best - my own cooking. Ouch. How awful does that sound, actually typed out in words?

I deserved destruction.

However, in an effort to prevent waste, the mixture that wasn't tipped out was adapted, and cooked, and it was entirely edible (or so I was told by those who could eat it - not me, it has sugar and gluten and other things I don't eat!).

When will I learn?

My imperfections - my sinful heart - are ever before me. I am SO glad for God's love and mercy in my life.  Sadly, I wasn't so merciful on my son. He needed to learn, yes, but I was so angry.  My heart is not perfect, like my heavenly Father. Simeon had been told to stay out, and to stop touching things, and he didn't.  Whom the Lord loveth, He chasteneth.  That's why we need to train our children, too. Simply, because we love them.  It could have been worse than mixture tipped on the floor.  It could have been a hot oven touched, or knives causing harm, by his disobedience.  I really hope he learns soon.  That, or my patience needs to be improved faster.

I humbly listen to my own words, and I pray I learn, too.

I will finish with my "iMovie" point.


My friend kindly introduced my children to an app, called iMovie.  You can do all sorts of fun things with it, and the children have used it for educational purposes, in the last two weeks.  I really cannot rate it highly enough, for usability, and inventiveness.  It encourages children to use their creativity in producing short films.  They can do it as  "trailer" type setting, or just in a free form way.  The first was a "trailer", outlining the science they were doing that day.  The second was a "dramatic production" of a scene from the life of Solomon (being studied in our Tapestry of Grace work, this week - it was an assignment to incorporate the whole family).

I gave the children feedback on it all, but I think it's a great first attempt at a dramatic adaptation! I can't wait to see what else they can do in the future.

Without further ado, I shall share their "movies" with you!


As ever, I'm linking up with Ben and Me.  Check out some of the other bloggers, and see what "I" they have shared.


Ben and Me

Tuesday, 24 June 2014

Tapestry on a Tuesday {Spotlight on Geography}

I thought it may be worthwhile to do a mini-series, of sorts, about the different elements involved in Tapestry of Grace. Don't be put off if you don't use TOG (Tapestry of Grace), there will be lots of helpful information in there which would be useful to any home educating parent.

The main areas covered in the curriculum are

History

Geography

Literature

Writing

Arts & Activities

It would be logical to begin with History, but I had my geography books out yesterday, when I was putting together my Unit 3 Workbooks, so I took a few pictures of those to begin with that.

Where to start? Lets start at the very beginning, a very good place to start...

 (Singing a line from The Sound of Music in my head, now...and so are you, now - SORRY!)

At the beginning of every new year of TOG, there is always a general overview of world geography.  It suggests that you make sure the student knows the major continents, oceans and  landforms.  It also covers the major geographical terms, and suggests that your children learn or review these.

When we are covering these more general topics, we use some readily available atlases.

Our favourites are these....


My general point of view is that you cannot beat a good Usborne title! They are extremely thorough, and very child-captivating in structure and style.


We also, recently, added this to our collection, suggested by a fellow TOGster (TOG "sister").  It covers the major definitions of geographical terms, and bar a few odd ones, all the ones suggested in the TOG "terms to learn" list.


They are accompanied by fun illustrations, which would suit young and older alike!


The wonderful thing about TOG, is that they have maps provided for you to use. The programme is called MapAids.  Obviously, you have to pay for them, but they are well worth the cost! It's a one off cost - once you buy them, you have them forever. You can purchase them per Unit, or per Year, with the usual benefit of it being cheaper to purchase a full year at once. You can also purchase them already printed, ready punched (for 3-ring binders).  Although more convenient, these are less helpful for larger families, where it's perhaps more cost-effective to print your own for each child, as, and when, you need them. It's also not so handy as the digital edition, for those like me, who would have enormous shipping costs for anything that is a "hard" copy.  You don't even need to be a TOG user to use these maps!  You can purchase them through the Tapestry of Grace website, or direct from KnowledgeQuest, but they don't have all the updated ones available there. You could certainly get a taste for them, and see if it wets your appetite to look into TOG further!  Obviously, it's best if you have the WHOLE curriculum, in order to experience the maps in the way they were intended....

Having a map provided, for nearly every week - sometimes more than one -  is just amazingly convenient. They are high quality, and produced by Knowledge Quest, who are industry experts in educational maps. They are mostly black and white, with a very little pale colouring (not heavy on the ink!), on the way through.  I print nearly everything on "fast draft" and it still looks super.

The maps cleverly take you on a journey around the globe, throughout the four year cycle, alongside the curriculum, to explore the geographical areas covered within each week of the curriculum.  Every continent is traversed, as your children label major cities, highways, rivers, oceans, and other points of interest along the way.  Shading and labelling are the two main ways that this is done.  It truly brings history to life, as you begin to understand the man made and natural boundaries, obstacles and expansions, as cultures advance, grow or decline.

There is also the option to do a Transparency Overlay project, where the child uses transparencies and permanent pens to fill in information on a continuing theme, showing changes over time.  I think this sounds like a great thing to do, but it's not an area we have ventured into yet, despite my enthusiasm at the start of the year. I need a willing student, first!

If you want to see more about overlays, visit THIS blog post, by my friend, Pam.


(You can see that more detail has been added in the second image, with another transparency layer added on top of the previous one/s.  This one is based on the subject of the states which were involved in the American War of Independence - or, as they call it, the Revolutionary War!)


 TOG suggests various different resources for your child to refer to, when filling out their maps.  They vary throughout the years, depending on the period of history covered.  Sometimes the information may be in the books listed as general references books, or they may be books specifically relating to geography and maps.

These are a few we having been using, so far, in Year 1, specific to mapwork.


This first one is a top little reference book, for any Bible scholar.  Not only is it available as a pocket edition, but it's packed to the gunwales with Biblical references and factual information relating to the maps. This information helps you to grasp a better understanding of Bible events, and where they took place in relation to each other.  


This book is suitable for younger, grammar level students, or for any age group.  These next two are recommended for older students, and my Dialectic aged child is currently using them.

The Kregel Bible Atlas sits somewhere between the more simple Bible Atlas and Companion, and the Holman Bible Atlas.  It has factual information, accompanied by maps, drawings and photographs. Whilst the Bible Atlas and Companion deals with Bible references, the Holman and the Kregel delve into other events happening at the same time as Bible events, giving you a bigger picture of what was happening in the world. 


Next, we currently use Journey Through the Bible.  The emphasis of this is more of a "fill in the gaps" from a cultural and historical standing, as you travel through Bible events.  For each Bible event it provides you with scriptural references, a narrative of information relating to those passages, and pictures and maps to go along with it. 

 For example,  in the page shown below, the story of the sun standing still at Aijalon is covered.  There is Biblical reference of Joshua 10:1-28, information about the battle and who and what was involved, illustrations of possible weapons that would have been used, and a map outlining the battle strategy which was implemented, as well as a photo of what the valley looks like today.  It's all very useful information, and very easy to follow.


This final book is also an invaluable title for any Christian home, but is specifically suggested for Rhetoric level students.  It's a larger, "meatier" book, with far more written information than the one above.  The maps are more detailed, and varied, and it also includes charts with timelines, as well as 3D maps and photos of current day locations connected to the historical information.  These allow you to grasp the majesty and beauty of many Bible land locations, not fully grasped when reading the scriptures.  Although this final one is suggested for Rhetoric students, it is a useful reference tool for any child and level.


Above and below are examples of  a 3D map, and a timeline list.


Another tremendously helpful tool in MapAids, are.. the TEACHER maps! Yes, there are reference maps, to allow you to see what the student should have filled in on their maps.  For the first four years, I would end up printing this map off if we struggled to find all the details we were supposed to be filling in.  It took me four years, but I came up with a nifty solution.  Given my love for binding, I printed off the entire year of teacher maps, and bound them together as our "Teacher Maps" reference book! When things get really tricky - and only if we REALLLLLY can't find the information elsewhere - it becomes our reference for filling in final details. In essence, it's simply using another "atlas", in a slightly cheating way, but as it's like "copywork" for maps, it's still a valuable tool in our homeschool setting.  It's better to have the maps filled in fully by simply "copying", than to not fill in the detail at all.  FINDING the answer for yourself is ALWAYS a great way to learn, but needs must, at times!

It looks just like our Student Workbooks, but is labelled according to which Year the maps are for, and that it is the Teacher's book.  It lives with my  TOG files, rather than on the shelf with the other atlases, and is only given when a child requests it, upon exhausting all other means of finding the answers.

Meanie teacher...

I was about to wind this thing up, when I remembered something else, which we haven't done in a LONNNNNNG time, but is immensely fun (though rather messy.... hence explanation of the length of time since we last did it. *aherm*)  It's making a SALT DOUGH MAP! You mix up a batch of salt dough, and recreate a geographical feature, or region, relating to your studies.  It helps the child grasp the topography of the area, as it's in 3D, as well as the flora and fauna, as your paint it according to the ground cover, and geographical features, of the region. I particularly remember doing on of Italy, and I can still remember where the mountainous regions are in that region!  If your child is very hands-on, then this method of learning geography will be RIGHT up their street.


This is one of Italy, which we did at the start of Year 2, first time around.


This is the children doing one of an imaginary island, containing major geographical features. I must have not taken a photo of the finished product, though! Sorry!

Alternatively, if you have a sweet tooth, a COOKIE DOUGH map may be your ticket.

Geography + a sweet treat = why, yes please!


(Image kindly donated by my TOGster, Pam. Find more about making these yummy maps in her blog post here.)


(This one is from another TOGster, Tricia. Read more about it on her log post here.)

Another clever one which Trica did, was PIZZA DOUGH maps! Yes, the food theme carries on with great aplomb!


I think I have covered all the bases for Geography, but if I think of anything else, or one of my TOGsters lets me know I missed anything, I will come back and amend the post.

I hope this has been useful to you, whether you already use TOG, are thinking about it, or just if you need a few ideas for geography in your own setting.

I'm linking up with Lisa, over at Tales of a Homeschool Family, if you want to see other posts from TOG users.

 talesofahomeschoolfamily